

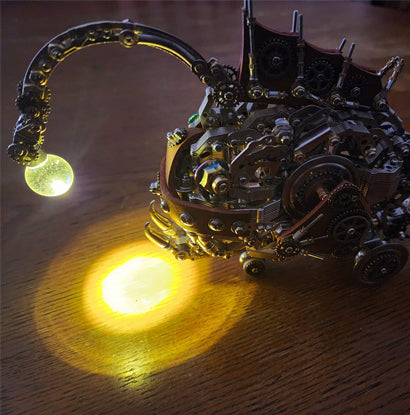


There are two things you should know about me. Firstly, I am a born and raised Australian. This means that I have grown up with some interesting (and sometimes creepy) wildlife all around me. With the exception of bees (due to an allergy, I respectfully give them their space) I have never given up the chance to interact with the creatures that have crossed my path. Secondly, when it comes to the artwork and trinkets I like to keep in my home, I always prefer something that I have put together myself and build a personal relationship with over something that can be bought as is, placed on a shelf and forgotten about. If either of these are something that applies to you, and you are looking for a model that has a function to offer as well as looking great all on its own, then I personally feel that the Halloween Spider Lamp is something that should be on the top of your “to buy” list right now.
In an effort to be fully transparent from the start, this is not the first model I have received from the Moyustore, and I can honestly say that it will not be the last. Nor is it the only contact I have with them. I have purchased both the ‘295pc Mechanical Firefly’ and the ‘295pc Mechanical Wasp’ for myself, as well as the ‘Metal Mini Scorpion’ for my son and am actively engaged on their social media page. So when a call was put out asking for people to review a product for them, I knew I had to jump at the opportunity. Figuring I would be reviewing a product that I had already bought and built, I was quite excited to find out that not only was I going to receive a model for free, but that I wouldn’t know what it was until it arrived.
Before I start on the review of the build process I will go over the negative points of this model. Though, in all honesty, there are not many to discuss. Nor would I say they are even major enough that they would dissuade me from paying full price for this product had I not already received it.
The first, and arguably biggest issue with this model lies with the instructions themselves. While the instructions are mostly easy enough to follow and provide step by step pictures for you to follow, the instructions are printed on a single A3 sheet of folded paper, with build photos printed on both sides. This is different from the other two mechanical models that I had previously bought, as they came with complete booklets with computer generated instructions to follow along with, allowing for very specific details to be explained on each step. Due to the instructions provided with the Halloween Spider Lamp not having these details, there were a few times where the orientation of the part wasn’t completely clear, leading to a part being incorrectly constructed. While the mistakes were easy enough to fix, I feel that they would have been avoidable had the instructions been printed to the same standard as previously bought models.

Halloween Spider Lamp Instructions
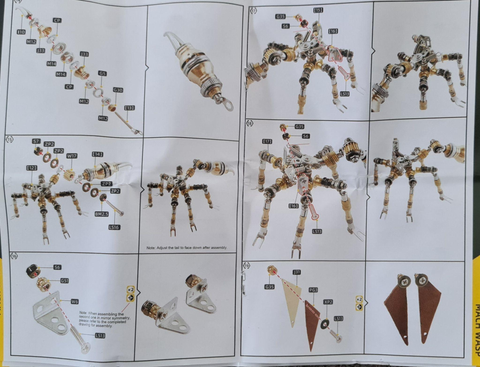
Mechanical Wasp Instructions
The only other “negative” point to discuss is in relation to the size of the parts used to build the model, though this could actually be considered a positive depending on your point of perspective. That is to say, that while the end result is a respectably sized model, each piece individually can be incredibly small. This means that unless you happen to have a model clamp to hold the part being pieced together (something I myself do not have), the size of the parts being joined can make it quite finicky, so more time and care may be needed in order to complete the more intricate stages.
When I received my package in the mail, all I wanted to do was tear into it and start building as quickly as possible. I would however strongly suggest taking the time to make sure you have a space set up to work on, as there will be quite a few moments where you will have quite a large number of pieces out on your workspace and keeping track of them is very important. I have found that laying out a green felt mat on my dining table works well for this as the individual pieces will show quite well against the colour.
I then followed this up by laying out all the parts in numerical order, and ticked them off against the supplied contents list. While this step has not resulted in finding any missing parts, across any four of the models I have now built, it is a great way for me to familiarize myself with each individual piece, before they are called upon within the instructions.

Workspace with all parts laid out
Last but not least, I took the time to read over the instructions multiple times, and try to get an understanding of how the instructions are put together, as well as finding any points within the build that may be repeated. This can save a lot of time as you can remove all the pieces from their bags all at once. This process really paid off right from the start, as the first section of the instructions is completely dedicated to building all 8 legs.
Starting the build and looking at the instructions provided have already shown me that there are a few repeated sections to pay attention to. For example, steps 1 and 2 would be repeated 8 times, so where step one asks for a single number 11 bolt, I already know that I can remove all 8 now and lay them out in individual groups so that once each one is complete, I can just move on to the next group of pieces, saving me from having to return to the parts and continually opening and replacing the bags.

First steps show four stages repeated 8 times

Step 1 & 2 sorted 8 times in preparation
This process can also be completed for steps 3-9, 10-11 and both steps 12 and 14. While steps 12 and 14 are used to connect different sections within the legs, the same pieces are needed to do so, so they can be worked on at the same time. The completion of these steps are where I really started to get excited about the size of the model, as once you get the legs together, there is a clear indication of the size of the completed spider. I often find that online stores items always seem smaller than promised when they are delivered, but this ended up being quite the opposite. Further proven by the unfortunate reaction of my wife once the completed spider was placed beside our bed.

Steps 12 and 14 sorted giving an idea of what the legs will look like
I felt at this point I had gotten into the groove of building this model as the next few stages went together quickly and without issue. While I later realized that attaching the legs to the cephalothorax of the spider just happened to be the easiest part of the built, it really allowed me to see how much thought had gone into the detail, as even know it was evident that this spider was going to look “less friendly” once it was completed. It is important though to take note of the instructions in step 23 as you will be asked to bend the legs “into a spider pose”, so it is at this point that some consideration will have to be put into how the spider will be sitting once completed.

Completed cephalothorax in it display position
Putting the legs aside for the time being, the instructions move onto the abdomen. This part of the build did look quite straight forward in theory, however the model does ramp up in difficulty due to how tight the working space can be. This is due to the clearance between each of the brackets that hold the flat curved metal plates to the cog that makes the base of the abdomen. A tip that might make these steps easier when building this section would be to leave the nuts holding the bracket to the cog a little loose so that the bracket can be turned slightly, and then tightened into its final position once all the metal plates are all attached. This is something that I didn’t think of until well after completing the spider, meaning that without having any model clamps available, building the abdomen had to be completed by carefully balancing the metal plates against the brackets while holding the small nut in place with needle nose pliers and trying to screw the bolt in while doing so. This did get the desired results, but it was very time consuming.

Balancing the metal plates while building abdomen
Once the metal plates have been fully attached to the abdomen, the hooks that will later hold the lamp in place will need to be built and joined to the end of the metal plates. While it is easier to build all 5 ahead of time, this was another situation that showed how small some sections were on their own, and I found that I couldn't hold all the parts of the hooks together and attach the nut at the same time. I found here that having a small screwdriver planted in the palm of my hand would allow me the ability to hold all the pieces together while still being able to screw on the final nut and lock everything into place. It’s worth noting that this screw driver didn't come with this model, however a glasses repair screwdriver would be more than sufficient for the job and can be bought quite cheap.

Using a small screwdriver to hold smaller parts while joining
Once I had the hooks attached to the abdomen I did a quick scan of the instructions again. This is the point where things go from side A to side B of the instruction sheet, so it helped to re-familiarise myself with what was happening from this point on. This is where I came across probably the only important step that is not explained well enough due to the style of the instructions. Steps 36 through to 38 look like all that is happening is some extra detail is being added to the abdomen, by adding some cogs to the metal plates. Step 38 however does have an important piece of information that shouldn’t be skipped over, indicated by the statement “one screw is different from the other screws”. Not only is this in place to allow the attachment of two rubber tubes toward the end of the build, it also dictates how the abdomen will attach to the cephalothorax over the next few steps. Extra care is needed to make sure this screw is placed in the opposite direction of the other four screws so that two screws are angled towards each other, facing towards the top and on opposite sides of the abdomen. The metal plates that form the top of the abdomen are dictated by being the centre piece between the two angled screws and guides the builder into placing the constructed triangular piece at the base of these metal plates, ensuring that it is pointing upwards to create the top of the spider.

“One screw is different from the other screws”
Once I had familiarized myself with how the two completed sections were to be put together, and I had attached the remaining pieces to the abdomen in the correct orientation, it was actually time to join the abdomen to the cephalothorax. It is worth noting that this point of the build pays to go slow and use care when trying to join the two segments as, while the process is quite straightforward, I found that the weight and size of the parts caused the articulating joints to move away from where I had wanted the final positioning to be. I also found that the extra movement of trying to readjust the pieces that shifted during the process of joining the two larger sections together also caused some of the nuts throughout the spider to come loose. This then added more time to the build as I then had to go through and locate the loose nuts and re-tighten them before I could move on. This is something that I feel I could have avoided had I taken more care during joining the segments.
The next part of the build I feel was both the easiest, and most satisfying part to complete. All steps in the building of the head are very straightforward and easy to complete, with the only exception being that some pieces are built in a mirrored orientation, and that the bolt that will hold the head onto the body needs to go through the correct holes in the cogs to make sure that it sits correctly. While this was easy enough to follow, it made the spider build so much more worthwhile to finally see how the design of the Halloween Spiders face had been engineered. And I have to say, it did not fail to meet the expectations set by the rest of the details found in the build.

Individual sections of the head ready to be attached
The last two stages of the spider are really up to individual preference, though I felt that the spider looks a lot more impressive once the rubber tubing and the lamp have been put onto the spider. The lamp itself is easy enough to install, placing it inside the abdomen with the globe facing towards the front of the spider, clamping the metal plates around the lamp and securing it in place with the hooks securing the lamp from behind. It is important to make sure the cord feeds out the bottom of the abdomen though, otherwise the weight of the lamp and cord will slowly force the abdomen to open up, allowing the lamp to fall out. Once I got to adding the rubber tube, I found that it was easier to cut the length supplied in half and attach it to the body of the spider first, then figuring out how much slack it desired and cutting it down to the correct size. The loose ends can then be connected to the abdomen of the spider, remembering that there is one screw that is different from the others that allows both screws on top to be facing the front of the spider for this purpose.
So what was the experience like? Even when I was struggling with the size of the pieces, or searching the floor for the tiny nut that slipped out of my hand and fell on the floor (more times than I care to admit), I thoroughly enjoyed every moment spent building this model. The end result looks amazing, and it is extremely helpful having it placed on my bedside table ready for me to turn on and search my room for any non-metal spiders that I catch out of the corner of my eye. I do live in Australia after all and we do seem to have an excessive amount of spiders crawling around here. Though, I can honestly say that none of them look quite as cool as the Halloween Spider Lamp. Don’t take my word for it though, have a look at how it turned out and decide for yourself whether this lamp is impressive enough to add to your house. I’m sure you will agree.


Russell Hoad