


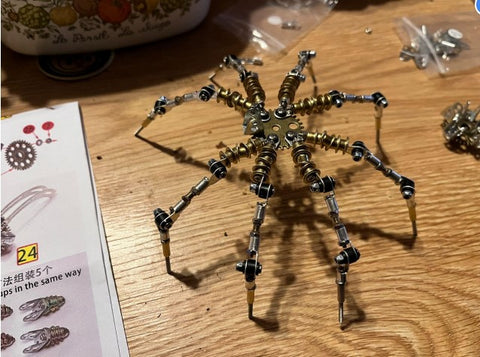
The spider build is great for any first-time builder.

Spider
This build is a great project for anyone who is interested in what is involved in doing a metal model build but has never done one before. This is a great first-time build with not too many complicated things to worry about and at the same time does offer some challenges. The complication is a 1 out of 5. The build was 2.5 hours to make.
Beginning
When you first get the package it will be in a box. If you do not have a building box or a small container to keep your hoppy crafts in then I would suggest that you do not throw this box away for it can help you to keep track of all the parts that are needed. When you first get the package open you will find the instructions and I can not stress how important it is that you read these and look over them closely

The second part of this that is very important is that you do not go and dump all the parts out in a bucket or box for a lot of the stuff will look alike and this can be very hard to find the proper part that you are looking for later. This project also comes with a small lamp that you use and it plugs into a USB adapter so you can use it on your computer to sit and watch you while you are working or you can plug it into an adapter and use it as a lamp.
When you first start to make the build it will be of the legs so I found that if you take just enough of the parts that are needed for each part of the build at a time it makes it easier time finding the parts that you are looking for. This is also helpful to keep the bags from getting tangled up with other parts that you are working on and spilling them on the floor. Below you can see how I am dividing up the parts to make sure that I have everything I need before I start to work on the first part of the build

The next part of the build is showing that I have the parts that are done set aside and I am starting to work on the next part of this build. In the directions, you will see that they let you know that you need to make sure you pay attention to the direction of how the parts are going together. This is very true for later when you start to put the project together if you do not have the parts in the right direction it will make it so they don't go together very well.

In this next part, you can see that I have started to build the next part of the legs. The major part of this that is very important to remember is to make sure that all the nuts and screws are tight once the parts are together. This is important due to when you start to put the spider together if the legs are loose it will cause them to swing loosely and then the spider will not stand up correctly ( I found this out the hard way

In the image below I am showing the watchers that go in between the leg parts. This is one of the hardest parts to work with. The reason for this is that you have to hold the legs and washers together while you are attempting to screw on the nut on the bottom. What I think is best is to do this part with some kind of container under you while you work. The parts came apart and fell on the floor a few times when I was trying to get them together so I figured I would help to save you some frustration.

In this part of the build, we are getting the body put together. Once you get to this part and the legs are on the body you should make sure that all the legs are tight and do not move with much ease. The reason for this is if they are to lose they will swing around and it will make it very hard for the spider to stand up for you as needed. It is also a good idea to have the legs all facing the same direction so that you can work on them in an easier fashion

This is when the spider starts to take shape and I started to add the brackets for the tail part of the project. At this point, it is a good time to go through and just do double-check all the joints of the legs to make sure that you will not have any issues in the future when the body starts to come together
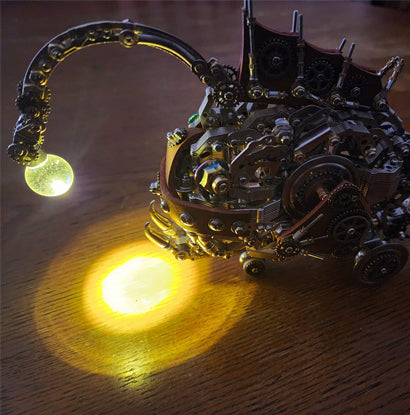
When I started working on the back part of the spider, the part that holds the lamp I found that one of the most important parts is the brackets that hold the arms to the body. This part is needed to be secured to the body and then make sure that it is slightly loose so that you can move the parts around until the end where you will want to set up the arms to sit in a particular direction and then tighten them from underneath.

This is the image of the underside of the arms that will hold the lamp part of the model. As you can see the nuts are under the back and you will need to leave this part a little loose until you get the arms fully built. The reason for this is that if you make them too tight now it is very difficult to work on putting the extra gears on and getting the room to move the pliers around to put in the nuts and the screws into the right placement.

I don't want to spoil too much of the build for you for it is a very fun build and one that anyone can do. You will need some dexterity for a few are the parts. If you have issues with your hands or they get sore very easily then this build will at times be a little hard but take your time and you got this. Enjoy I know that I did.